Showing posts with label Color Ready Seam Binding. Show all posts

Monday, March 26, 2012

Seed Packet Door Hanger - Cricut Class Project


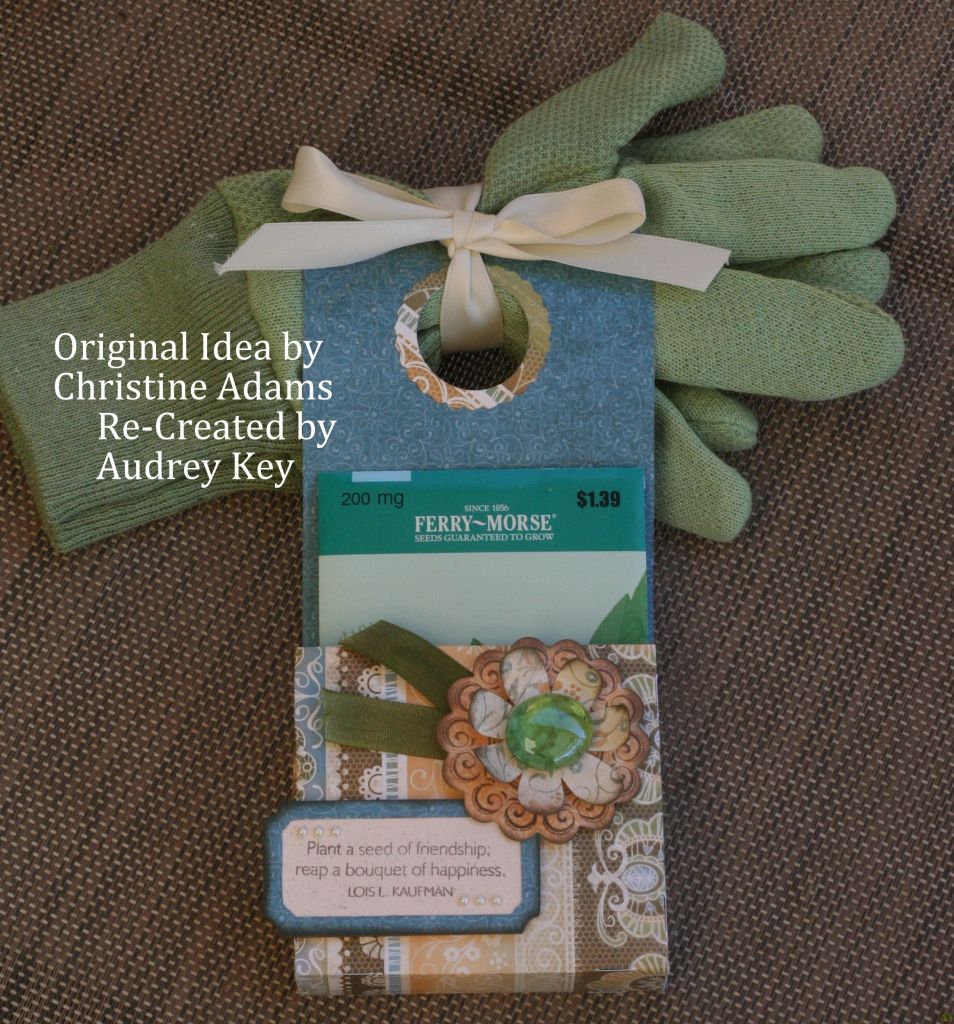
First, let me say that this project was inspired from my friend, Christine Adams.  She is very, very talented and made this project with the Lucy paper packet.  It was so darling, I knew that we just had to make that our Cricut Class
project for March!

This door hanger is on page 25 of the Cricut Art Philosophy Booklet and it is on the Font Layer.  I cut the door hanger as  "Fit to Page" and the Cricut cut it as an
11 1/2" door hanger. 


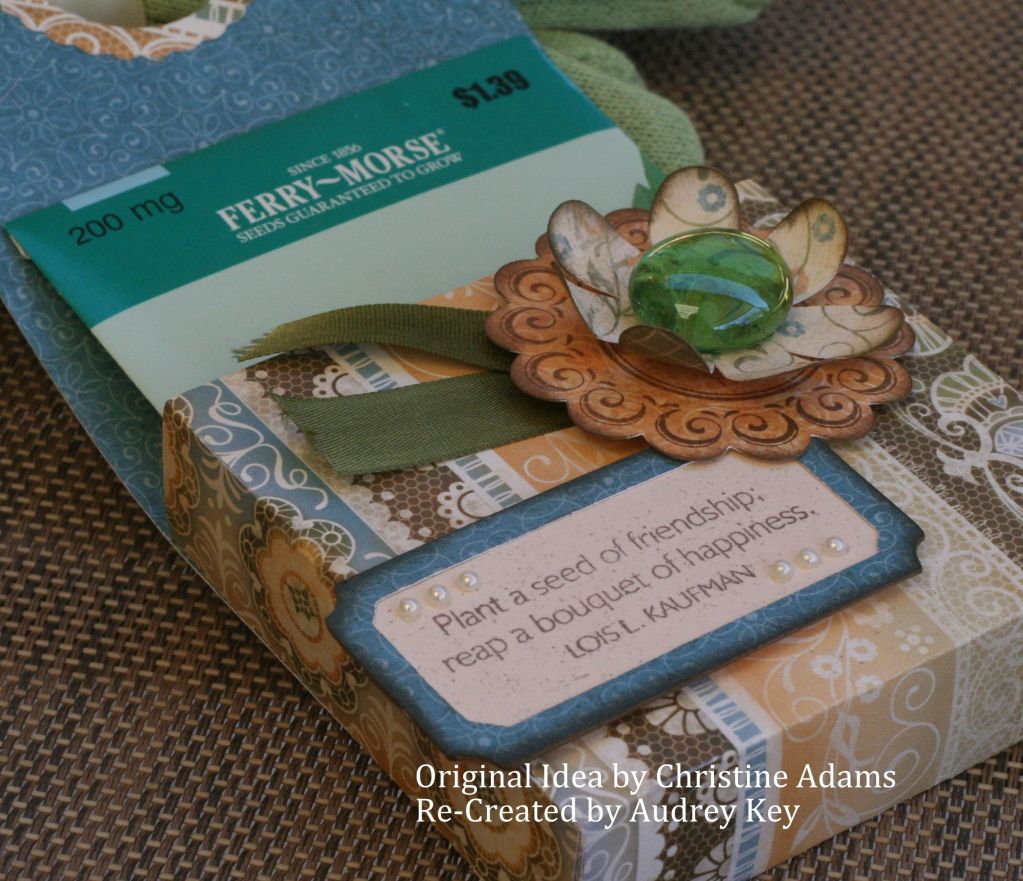
I used the Enjoy stamp set to stamp the flower (it is a Cricut image and the stamp says "freshly baked" - we covered the sentiment with the top flower).  I cut out a second flower on the Cricut.  We curled the petals upward on the top flower and layered the flowers with 3D Foam tape.  We used a glue dot to adhere a glass pebble to the flower center.  

The flower leaves are made from our new Color Ready Seam Binding - I used a sponge dauber to apply Olive ink to the seam binding.  The sentiment is from the May Stamp of the Month "Friendship Bouquet."  Pearl opaques were used on the corners of the sentiment. 

We used ribbon to add gardening gloves from Dollar Tree and a Basil Seed Packet purchased at Wal-Mart.   These would  be great little gifts for teachers or someone special.

**Tip - When adding ink to Color Ready Seam Binding, use a hot dry iron to help the drying process along .  Adhesive won't stick to wet ribbon!

Tuesday, March 20, 2012

Housewarming Gift Clear Card


I made this card for a friend that just moved into a new house to go with her "housewarming gift."  This clear card is adorned with all 6 patterns from the Florentine paper packet.  Florentine is so versatile and it can be used for
many different themes. 

I used the Enjoy stamp set that is featured with Florentine.  I cut a rose from the Florentine B&T with the Cricut cartridge and sponged the edges of it with Cocoa ink.  I used our fabulous new Color Ready Seam Binding for the leaves and used a dauber to add Olive ink to it.  I also used our new Just Blooms Paper Shapes and added Creme' Brulee ink to it.  I folded it up and adhered it with 3D Foam Tape.  Opaques are the perfect embellishment for this beautiful paper!

Thursday, March 15, 2012

Florentine Happy Birthday Card


This birthday card was created from our Florentine paper packet.  Florentine is suitable for many different themes.  I used several stamp sets on this card:  Potential (March Stamp of the Month), Enjoy (the largest flower), 4 My Friend (the "happy birthday"). 

The embellishments that I used are:  Just Blooms Paper Shapes (just add ink), Pin Clips, Durables Pewter Stud, Color Ready Seam Binding (I added olive ink with a dauber to make beautiful ribbon leaves), and a flower button from the basic button assortment. 

Wednesday, March 7, 2012

Celebrate Clear Card


I have been working with the Super Hero paper packet this week and it doesn't take long to realize that it isn't just a boy's Super Hero kit.  It is great paper for making patriotic cards and layouts as well.  I know that it is premature timing for patriotic cards but since I have been working with that packet I thought I would share it.

I used the Cricut to cut out the large star and stamped it with the large star in the American Celebration stamp set.  The small chipboard stars were stamped with the border stamp in the Super Hero WOTG stamp set and then I ran the brush tip of our Cranberry marker on the edges of the chipboard (what a fast way to cover the edges of chipboard!).  I added our Color Ready Seam Binding and sparkles to embellish the front of this card.


Clear cards are so much fun to work with because you get to show both sides of the B&T paper patterns.  You only need a little adhesive too as it attaches permanently and easily to the plastic.


I have been itching to use our new adhesive springs on a project.  I used one inside the card under the fireworks.   These awesome little gems are only $2.95 for 6 of them and they really add pop to your card making projects.  When you open this card the fireworks spring out at you.  Very Cool!!! 

The Super Hero WOTG kit includes:  Super Hero Paper, Super Hero Stamp Set, Dimensional Elements Stars (Cricut Compatible with measurements on the package), Comic Badge Buttons, and the Super Hero Workshop Guide.  The WOTG kit is $35 (including the tax and shipping).  Currently, I have not  scheduled this kit on my regular class schedule.  However, if there are those of you that would like to attend a workshop for this kit, please email me and we will find a date.


Friday, February 10, 2012

Tailor Made Card #2


I copied this card from one of the cards we made at Stamp Camp.  The reason that I am posting a similar card, is that in the Stella paper packet there are 2 sheets of paper that have sewing patterns on them (look like the tissue patterns that you cut out for making garments).  When I saw this paper, I knew that I had to use the Tailor Made stamp set with it. 

I used the wax paper technique  (with Sunset, Tulip and Lagoon stamp pads) that I detailed in the original Tailor Made post.   I used Color Ready Seam Binding and Opaques to embellish this card.  I also used one of the flowers from the Color Ready Accents (sponging it with Tulip ink). 

Thursday, February 9, 2012


We made this little composition book at  $10 Month Club Playgroups earlier this month.  I bought the mini composition books at Target (when they had the school supplies out in August).  We used the Stella paper packet, Color Ready Seam Binding, and a button from the Red Button Assortment.  The stamp set is one of my favorites!  It is called Quick Cards - Butterfly and it is ONLY $6.95!  It is a great deal for a beautiful stamp!  We have lots of new "Quick Cards" stamps in the catalog.

**Tips - The technique that I taught at Playgroups was
"Rock 'n Roll".  We stamped the butterfly in Sunset ink and the Rock 'n Rolled it in Tulip ink around the outer edges.  We also used the Black Stubble Tool to distress the background of the butterfly piece.